11 Oct 2022
Recently, after Heroku announced removal of their free plans, I migrated my hobby project from Heroku to Render.
Render, https://render.com/, is yet another cloud application hosting. According to the Internet, it’s a good alternative to Heroku.
It doesn’t support Java out of the box, but you can host anything with Docker.
To deploy your Ktor application, we need two things. First, add io.ktor.plugin plugin to your root build.gradle file:
id("io.ktor.plugin") version "2.1.2"
This plugin adds buildFatJar Gradle task which creates an executable JAR with all dependencies.
Next, you create a new file in your root directory named Dockerfile. Dockerfile is a text file that describes how to create an image. In our case, we use Dockerfile from Ktor documentation:
FROM gradle:7-jdk11 AS build
COPY --chown=gradle:gradle . /home/gradle/src
WORKDIR /home/gradle/src
RUN gradle buildFatJar --no-daemon

FROM openjdk:11
EXPOSE 8080:8080
RUN mkdir /app
COPY --from=build /home/gradle/src/build/libs/*.jar /app/ktor-docker-sample.jar
ENTRYPOINT ["java","-jar","/app/ktor-docker-sample.jar"]
Keep in mind to replace the ktor-docker-sample with your project name.
Now it’s time to do git commit & git push.
Next, in the https://render.com/ dashboard, you select New -> Web Service and connect your GitHub/GitLab repo. Default options are good enough.
After that, the build should start, and at the end you should see a green tick with “Deploy live for XXX” text.
Happy building!
05 Feb 2022
I’m playing with Ktor, and yesterday I tried to serve some static content.
According to the documentation, to publish files from the resources directory, you have to do the following:
routing {
    // /static is a remote path under which files from the assets folder will be accessible
    static("/static") {
        // assets is a folder in the resources directory in your project
        resources("assets")
    }
}
It worked locally, but when I pushed my changes to Heroku, I got this error:
java.lang.NoSuchMethodError: java.nio.ByteBuffer.clear()Ljava/nio/ByteBuffer;
I’m using Ktor with Kotlin 1.6.10 without any special config or dependencies.
The issue happens due to some incompatibilities between JDK 1.8 and JDK 1.8+.
To fix the issue, I decided to set jvmTarget and runtime to Java 11.
To do so add the following code to your build.gradle.kts file:
tasks.withType<org.jetbrains.kotlin.gradle.tasks.KotlinCompile> {
    kotlinOptions.jvmTarget = JavaVersion.VERSION_11.toString()
}
To specify the Java version on Heroku, you need to create the system.properties file with the following content:
Ref.: https://devcenter.heroku.com/articles/java-support#specifying-a-java-version
Happy building!
16 Dec 2021
It’s just a small reminder regarding web intent resolution in Android 12. As it’s described in the Behavior changes: all apps section for Android 12 and in the Create Deep Links to App Content guide, you need to have your domain linked with your app.
Note: Starting in Android 12 (API level 31), a generic web intent resolves to an activity in your app only if your app is approved for the specific domain contained in that web intent. If your app isn’t approved for the domain, the web intent resolves to the user’s default browser app instead.
All steps to make it work are clearly described in the Behavior changes: all apps section for Android 12:
19 Jun 2021
I learned the basics of LaTeX during my studies. One of our teachers was a big LaTeX fan and was encouraging students to write their diploma thesis using it. I wrote both my bachelor’s and master’s thesis in LaTeX.
Recently, I use LaTeX very rarely, mainly for my resume, and in this post, I would like to show you how to set it up on macOS.
- Install MacTeX Distribution (beware: it’s HUGE! ~4 GB).
- Install Sublime Text (both 3 & 4 are OK).
- Install Package Control:
- open the command palette by pressing
cmd + shift + p,
- type “Install Package Control” and press
enter.
- Install LaTeXTools plugin:
- open the command palette by pressing
cmd + shift + p,
- type “Install Package” and choose “Package Control: Install Package” then press
enter,
- type “LaTeXTools” and press
enter.
- To compile your
*.tex file:
- open it in the Sublime Text,
- open the command palette by pressing
cmd + shift + p,
- type “Set Syntax: LaTeX” and press
enter,
- build your document by pressing
cmd + b.
Happy writing!
22 Apr 2021
Recently, I started using KptnCook, and it’s a great cooking app with recipes changing daily.
What’s funny, it’s that it made me realize we have timer Intent in Android. When we go to the cooking steps screen, it’s embedded inside steps description:
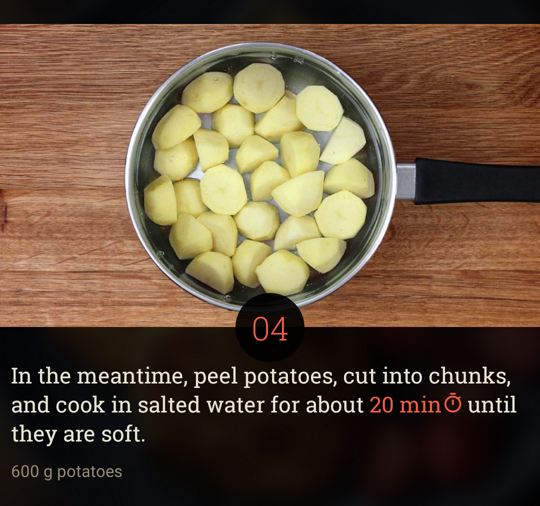 After clicking “20 min”, the Clock app is opened, and the timer starts.
Creating timer Intent is simple! We need to use AlarmClock.ACTION_SET_TIMER action and provide timer details:
To recreate KptnCook’s timer behavior we need:
val timerIntent = Intent(AlarmClock.ACTION_SET_TIMER).apply {
  putExtra(AlarmClock.EXTRA_LENGTH, 20 * 60) // 20 minutes
  putExtra(AlarmClock.EXTRA_SKIP_UI, true) // start timer automatically
}
Then we call startActivity(timerIntent), and that’s it.
Wait! There is one more thing… We need to add:
<uses-permission android:name="com.android.alarm.permission.SET_ALARM" />
to the AndroidManifest.xml.
If you would like to learn more about commonly used Intents, visit Common Intents guide.